

Description
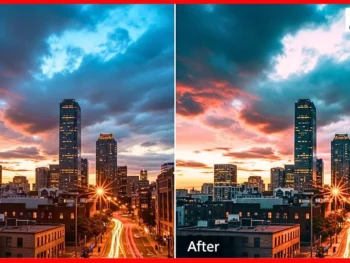
My neighbour grows the most beautiful roses I have ever seen. Deep crimson petals, perfect symmetry, dewdrops catching morning light. I photographed them last spring with my phone, and the result was heartbreaking. Flat colours, washed-out petals, and the green background looked like faded plastic. My neighbour saw the photo and asked, ” Is that my garden?” with genuine disappointment. That embarrassment pushed me to find a garden photo look professionally shot without spending money on expensive editing software or paid presets. After testing 9 different free methods over the past year, I found one approach that consistently transforms amateur garden photos into images that look like they belong in a gardening magazine. Here is exactly what I discovered in 2026.
The Free Tool That Changed My Garden Photography
Lightroom Mobile is completely free to download on both iPhone and Android. Most people do not know this because they assume Lightroom requires a paid subscription. The mobile version offers enough editing power to transform garden photos dramatically without spending a single rupee.
What Makes Garden Photos Look Flat in the First Place
| Problem | What Causes It | Free Fix Available |
|---|---|---|
| Dull Flower Colours | Phone camera auto processing | Yes, Vibrance and Saturation adjustment |
| Grey Looking Greens | Overcast lighting | Yes, HSL Green Hue shift |
| Washed Out Background | Harsh midday sun | Yes, Highlights and Whites reduction |
| No Depth Between Layers | Flat phone lens | Yes, Clarity and Dehaze tools |
| Boring Sky Above Garden | Auto exposure balancing | Yes, Graduated Filter tool |
Understanding these five problems is the foundation of improving garden photos. Every free fix I recommend targets one or more of these specific issues.
The Free Editing Workflow I Developed Over 12 Months
This is the exact sequence I follow for every garden photo now. I developed this order through trial and error across hundreds of garden images in 2026.
- Open the photo in the Lightroom Mobile free version
- Pull the Highlights slider down to negative 40 to recover bright flower detail
- Push the Shadows slider up to positive 30 to reveal dark leaf detail
- Increase Vibrance to positive 25 for a natural colour boost without oversaturation
- Open the HSL panel and shift the Green Hue slider to negative 10 for richer, natural greens
- Increase Green Saturation by a positive 15 to make foliage pop
- Add Clarity at positive 20 to enhance petal texture and leaf veins
- Apply Dehaze at a positive 10 to cut through atmospheric haze
- Use the Graduated Filter on the sky area to darken it by 0.5 stops
- Export at maximum quality
This entire process takes 2 to 3 minutes per photo. The results consistently look like professional garden photography.
Why This Method Works Better Than Instagram Filters
Instagram filters apply blanket colour changes across the entire image. That approach fails for garden photography because flowers, leaves, soil, and sky all need different treatment. A filter that makes roses look vivid simultaneously makes green leaves look neon, and the sky look purple.
The Lightroom Mobile method targets each colour channel independently through the HSL panel. You can boost rose red without touching green. You can enrich green leaves without affecting the blue sky. This selective control is what separates professional-looking results from obvious filter application.
The Free Preset Discovery That Saved Even More Time
After perfecting my manual workflow, I saved my settings as a custom preset inside Lightroom Mobile. This is completely free. No paid subscription needed. Now I tap one button,n, and the entire workflow applies instantly to any garden photo. I created three variations. One for sunny day gardens. One for overcast conditions.One focus-up flower macros. All three presets live in my free Lightroom Mobile app, ready to apply in seconds.
Real Results From My Actual Garden Photo Collection
My rose photos transformed from flat phone snapshots into images with visible petal texture, rich colour depth, and natural background blur enhancement through the Clarity tool. Sunflower shots gained that golden warmth that makes them look like they are glowing from within. Herb garden photos showed individual leaf detail that was invisible in the original shots. Even my struggling winter garden photos with bare branches and frost gained a spherical mood through the Dehaze and Clarity combination.
The most dramatic improvement came on photos taken during the golden hour. Late afternoon garden shots with warm side lighting responded beautifully to a slight vibrance increase and shadow lifting. The combination produced images that my friends genuinely believed came from a professional camera rather than my three-year-old phone.
What This Free Method Cannot Fix
Blurry photos remain blurry. If your phone could not focus properly on the flower, no amount of colour correction will create sharpness that was never captured. Extremely dark or extremely overexposed photos have limited recoverable data. Photos taken in heavy rain with water droplets on the lens cannot be corrected through colour editing alone. Understanding these limitations helps set realistic expectations.
The Comparison Against Paid Garden Photography Presets
Paid garden photography presets typically cost ₹500 to ₹1,500. They apply similar adjustments to what I described above, but in one click. The advantage of paid presets is speed and consistency. The advantage of my free method is zero cost and full control over every adjustment. For hobbyist garden photographers posting on social media, the free method produces results that are visually indistinguishable from paid preset output.
Professional garden photographers shooting for magazines or clients should consider paid presets purely for the time savings across large batches. For everyone else, the free Lightroom Mobile approach delivers genuinely professional results.
Frequently Asked Questions
Does Lightroom Mobile Really Work Without Paying
Yes. The core editing feature,s including all the tools mentioned in this guide, is completely free on Lightroom Mobile for both iPhone and Android. The paid subscription adds cloud storage, desktop sync, and some advanced features, but the editing tools themselves are free.
Can This Method Work on Indoor Plant Photos Too
Absolutely. Indoor plant photos actually benefit even more from this method because indoor lighting typically creates colour casts that the HSL adjustments correct beautifully. The Green Hue and Saturation adjustments make indoor houseplant photos look vibrant and healthy.
How Long Does the Editing Take Per Photo
Manual application following the full workflow takes 2 to 3 minutes per photo. Using the saved custom preset reduces this to about 15 seconds per photo with minor adjustments.
Will This Work on Photos Taken with Old Phone Cameras
Yes. I tested on photos taken with phones ranging from 3 to 5 years old. Older phone cameras produce flatter images, es which actually respond more dramatically to colour enhancement. The improvement is often more visible on older phone photos than on recent flagship phone photos,tos which already apply heavy processing.
Can I Share My Custom Preset with Friends
Yes. Lightroom Mobile allows you to export your custom preset settings as a DNG file. Send that file to anyone,yone and they can import your exact settings into their own free Lightroom Mobile app.